In the setting menu you can make the required settings to optimize your daily operation.
From the main menu, select “Manage" then select "Settings" tab. On the left hand side you can navigate through the different topics.
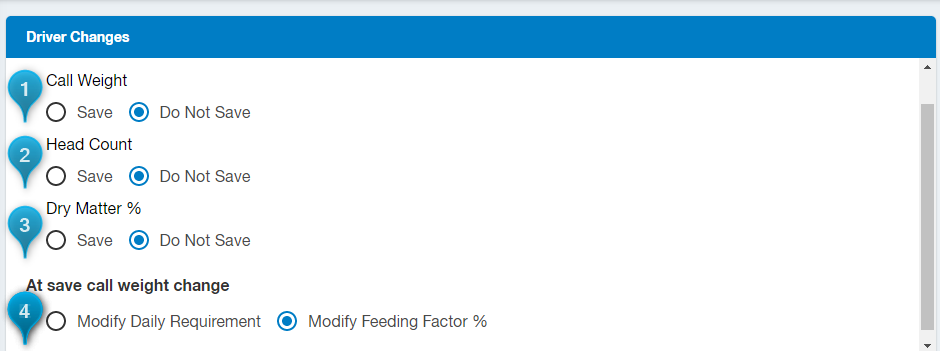
Driver Changes:
It is possible to set per item what to do with changes (e.g. Head count or Call Weight) a driver made on the display or FEED app. If you select to save these changes, all loads will be updated accordingly.
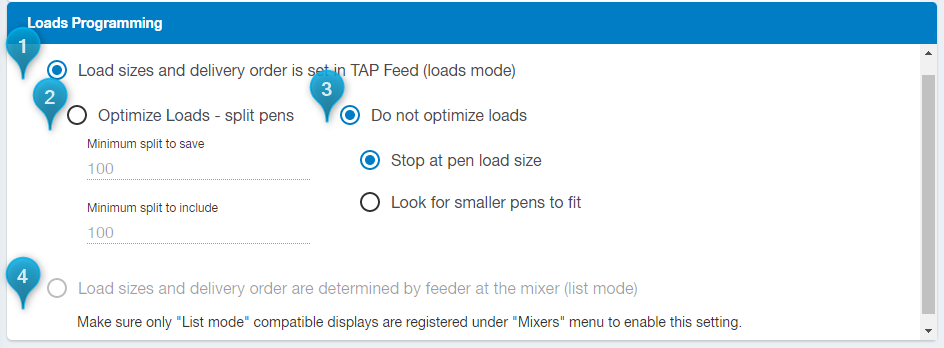
TAP FEED builds loads by combining pens which receive the same ration into a single load.
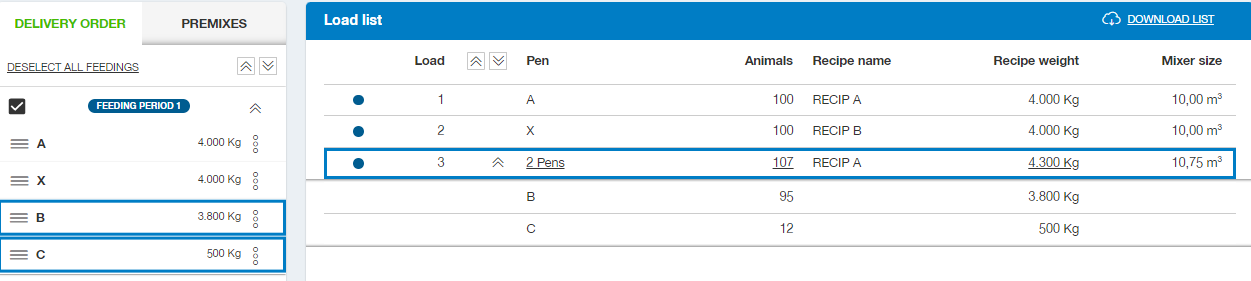
2. Optimize loads - Split pens:
When selected, the system looks for succeeding pens that receive the same ration. This allows to use the available mixer capacity as efficient as possible.
The "Minimum Split to Save" value shows the minimum weight for a pen that should remain before starting a new load. If, after splitting a load, the remaining weight for a pen is smaller than the weight entered here, the pen will be ignored and included in a new load.
The "Minimum Split to Include" value is the minimum required space (weight) left in a mixer before a new pen will be added to the load. If the resulting unused space in the mixer is smaller than the value entered here, no pen will be added to this load.
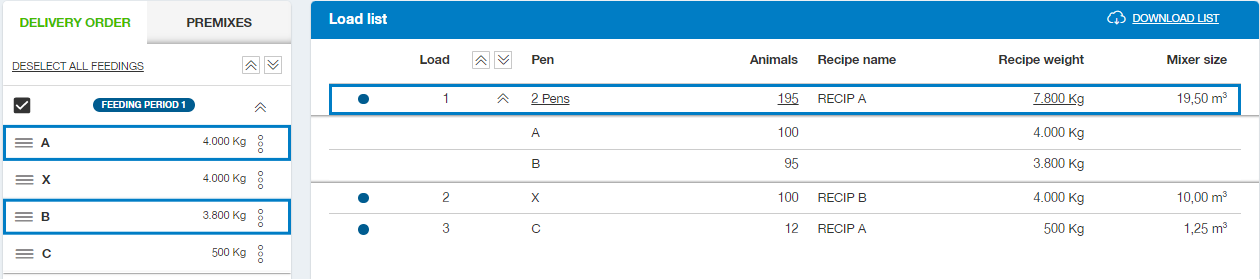
3. Do not optimize loads:
When selected, these settings either look for smaller loads to combine into a bigger load anywhere through the list of loads or by order until the load is full.
4. (List mode) Load sizes and delivery order are determined by feeder at the mixer:
Rations and pens are sent to the mixer as separate lists. The feeder determines load size and pens feeding order at the mixer.
Herd Management System (only available with the Link add-on activated):
Settings for the import of data from your Herd Management System can be found here. Before starting the configuration of the import, make sure to check if the Herd Management System supports the data export required.
NOTE: The actual configuration of the export in the Herd Management System is not the responsibility of the Topcon Feed Management Support agent.
1. Selecting [Herd Management System] allows you to view settings and make changes to the import of data from your Herd Management System
2. In the middle section it is possible to change the processing of data from ‘Automatic’ to ‘Manual’ and you can deactivate which data should no longer be imported from the Herd Management System. Activating these options should be done through the TAP FEED AGENT.
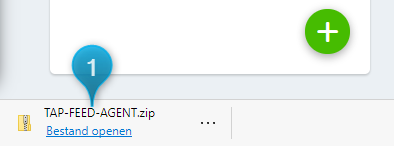
3. When the TAP FEED AGENT is not installed yet, you can download it here. Click to download the "Installer Zip" file.
FEED_Agent.png13.75 KBUnzip and run the installation program: "TAPFeedAgentSetup.exe" (1)
Select the language the Setup will use during the setup.
Follow the on-screen instructions and accept default settings to complete the setup.
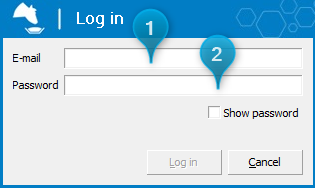
Agent_log_in_with_nr.png22.27 KBEnter "E-mail" which is used to log in into your TAP account (1)Enter "Password" which is used to log in into your TAP account (2)
4. To link which pens from the Herd Management System are which pens in TAP FEED, you can add new links here. You can link multiple pens from the Herd Management System to one pen in TAP FEED. You cannot link one pen from the Herd Management System to multiple pens in TAP FEED.
5. To save changes made, make sure to press 'Save'.
Feeding periods
In this part the names of feeding periods and the times can be managed.
1. The name of the feeding period can be changed by using the pencil icon
2. When data is send automatically, the send time for each feeding period can be set here. You can also differentiate between the different days of the week
3. The colour belonging to the feeding period can also be changed. You can choose from the different colours in the drop down menu.
4. To save changes made, make sure to press 'Save'.
Pen Types
Each pen has a pen type linked. You can edit or add pen types through this section. These pen types can be used to apply filters based on the pen types.
1. New pen types can be added. The pen class can be chosen from a drop down list (youngstock, dry cows, milking, other or hospital). The pen name can be entered
2. An existing pen type can be changed. Both the pen class and the pen type name can be edited
3. Pen types can only be deleted if they are not is use for any of the pens
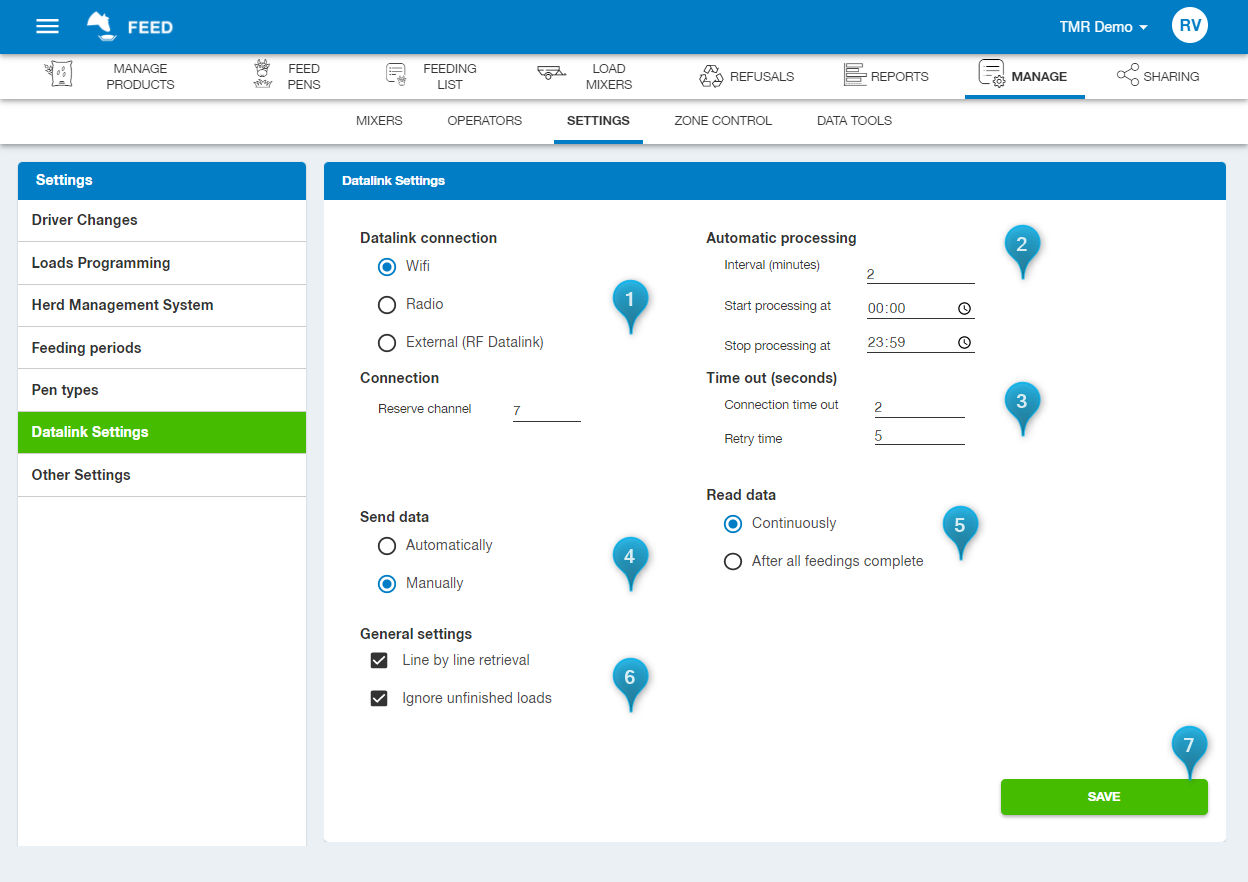
Datalink settings
When you have a display model that supports datalink communication, settings can be changed in this section.
1. Settings available are dependent on what type of datalink connection is being used
2. Automatic processing can be set. When start and stop processing times are entered, outside these values no communication will take place
3. Time out in seconds can be altered here (consult a Topcon software technician for these settings)
4. Data can be either send automatically once a day or manually. After data is automatically send, manually sending is available as well
5. Data can either be read continuously every time the mixer is in reach. During feeding, communication will not run. Another option is to receive data after all feedings are complete. For this, the display needs to be setup correctly.
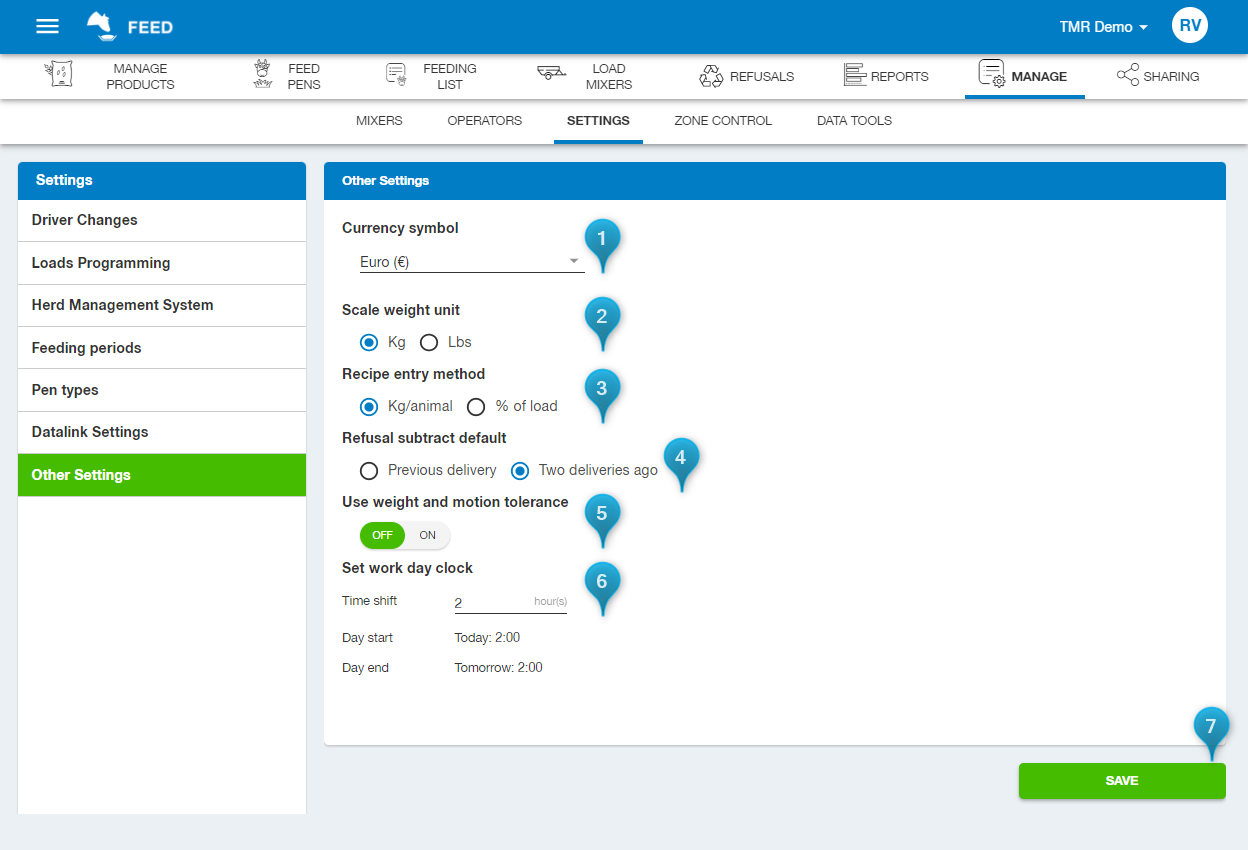
1. The currency symbol can be changed and will not change the values. These are used where price is use (for example reports)
2. By default this will be set to the correct weight unit once your account is created and should NOT be changed without consulting the support team.
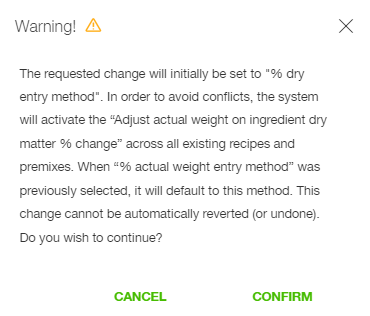
3. Percentage of load can be used instead of the kg/animal or lbs/animal recipe entry method. When changing to %, TAP Feed will prompt a warning: Warning_percentage_of_load.png21.19 KB
This indicates that the entry method will be put on changing the percentage based on the Dry amount. This can be altered later in the recipe itself.
Next to that, it will also activate ‘Adjust actual weight on ingredient dry matter % change’ in all recipes. When you previously used this percentage recipe method and you were using the ‘% actual weight entry method’, the change will revert back to this previously used setting. For this recipe entry method, the option ‘Adjust actual weight on ingredient dry matter % change’ is not available.
4. Refusal subtract default enables you to either subtract the received refusal amount from the previous delivery or from two deliveries ago
5. Indicate if you send weight tolerance to mixer. When the setting ‘Send weight tolerance to mixer’ is activated, this data will be sent to the mixer (the TAP Feed Feed mobile app does not support the weight tolerance). These values will overwrite the values set on the indicator. The values can be set with ingredients, premixes and pens.
6. If you are feeding over midnight but those feedings should be saved to the previous day, using the time shift will make it possible to change the day start and day end
By default the time shift is set to 0 hour (00:00 – 00:00). When your work day deviate from today 0:00 till tomorrow 0:00, then you can enter a time shift in hours
7. To save changes made, make sure to press 'Save'.
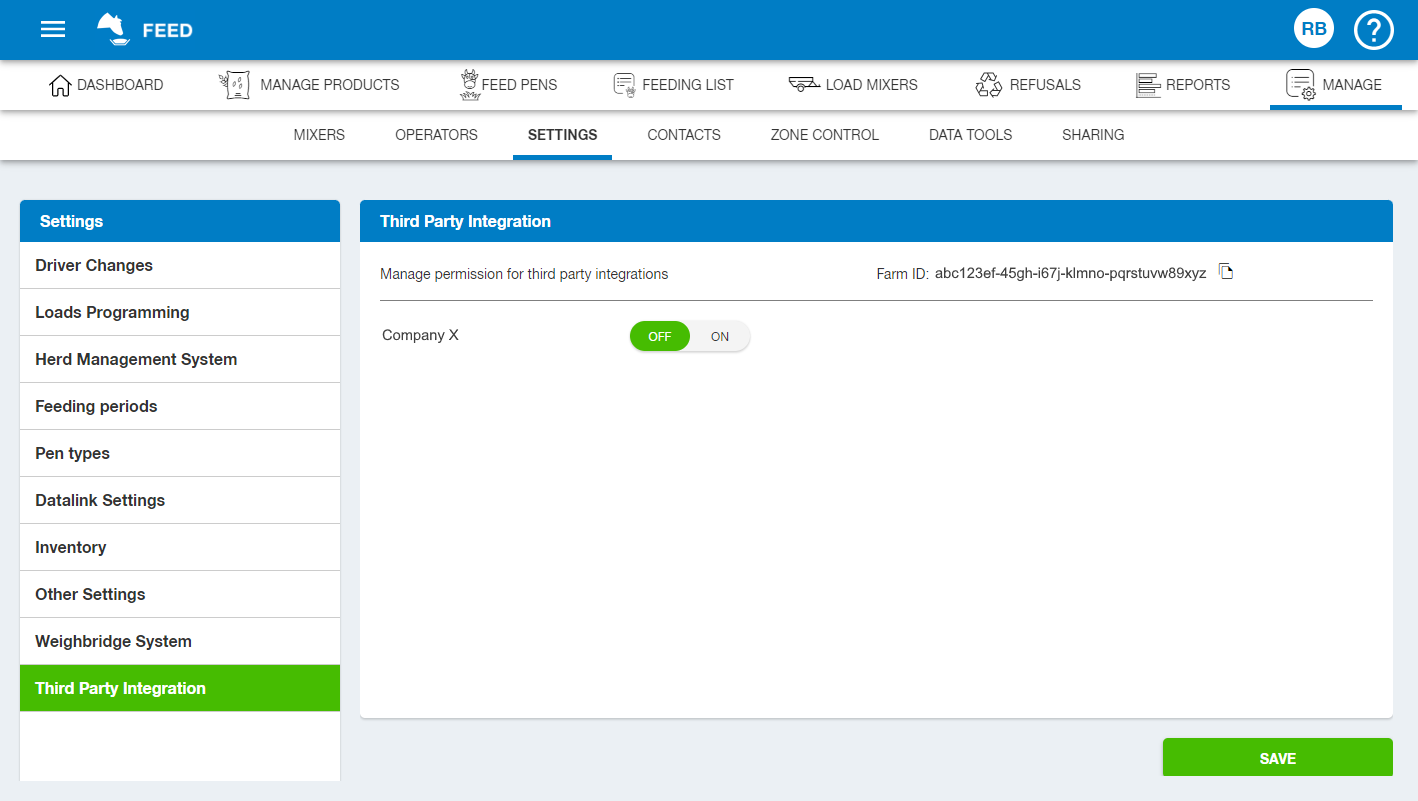
Third Party Integration
For third parties an API has been developed to provide the option to integrate with TAP FEED. Third_Party.png71.95 KB To use the integration, first contact the third party shown in the list about the options. Only when the option is set to 'ON', the corresponding third party can use the data.
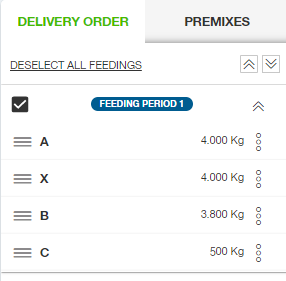
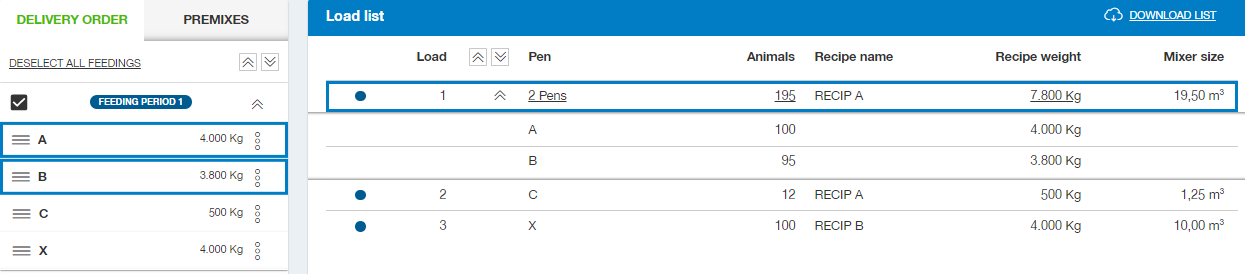
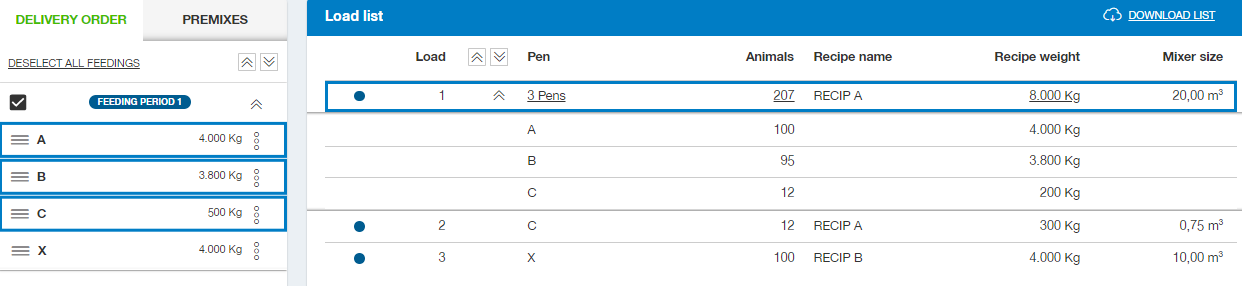
Optimize Loads Examples:
A couple examples to explain how the settings will influence the loads. For these examples a mixer 20m3 size is used and 'RECIPE A' has a density of 400 kg/m3.
Example 1: Do not optimize loads - stop at pen load size.
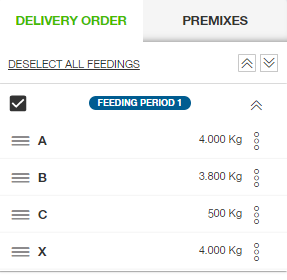
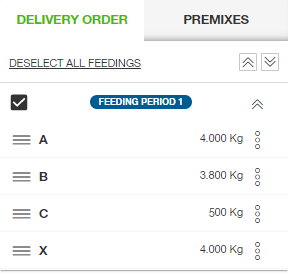
Pens A, B & C are scheduled with the RECIP A pen X is scheduled with RECIP B. The load order is:
Afin de mieux comprendre votre utilisation de ce site, nous faisons usage des témoins et votre visite est suivie de façon anonyme. Aucune information personnelle n'est conservée.


 Témoins et suivi analytique