Weighbridge
Data collected from a weighbridge can be imported in TAP FEED if the weighbridge software can export a supported file. After import, these weights can be processed to update the inventory of the ingredients accordingly.
The WEIGHBRIDGE functionality can be found through [INVENTORY][WEIGHBRIDGE].
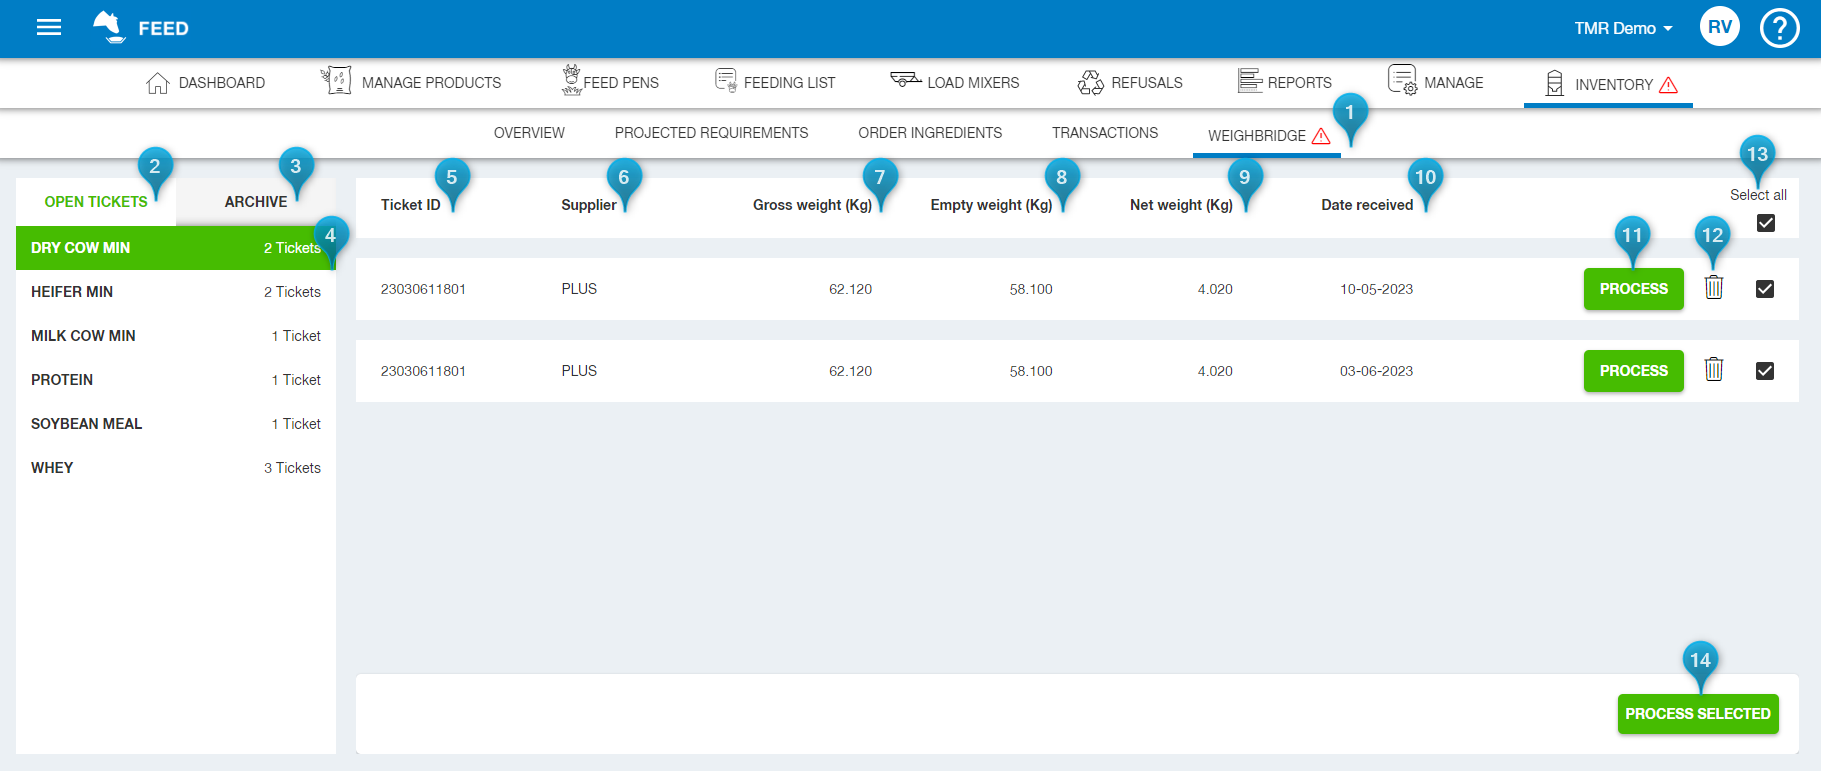
1. WEIGHBRIDGE is a sub menu within INVENTORY. When there are open tickets present within WEIGHBRIDGE, an exclamation mark is shown. The exclamation mark disappears when the open tickets are either removed or processed
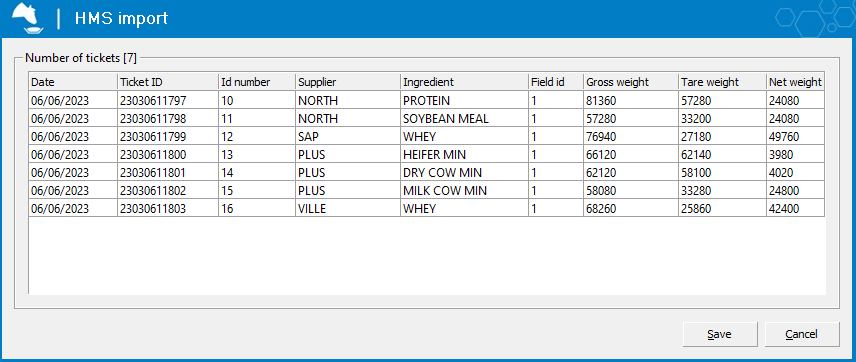
2. After data is processed from the weighbridge, the data is shown under the open tickets. A list with the received ingredients is shown.
3. Tickets are moved to ‘ARCHIVE’ after they have been processed
4. When there are multiple tickets for the same ingredients, the # tickets is displayed as well under the tab OPEN TICKETS
5. The ticket ID is imported from the file and is shown here to differentiate between the different imports
6. The supplier is imported from the file, but is not added to the list of contacts within TAP FEED. This supplier is used when the ticket is processed and save a link between the weighbridge supplier and TAP FEED supplier. When a previous linked supplier is linked to a different supplier, only the last link is saved.
7. The gross weight is imported from the file
8. The empty weight is imported from the file
9. The net weight is imported from the file
10. The date received is imported from the file to determine transaction date
11. Weights of open tickets are only added to the inventory after the ticket has been processed. After clicking on the ‘process’ button, a new window opens where the correct details can be entered:
a. Select which ingredient the weights received should be matched to
b. Select the receive option that applies. Choose if it is a receive for an already entered order or if it is a direct delivery (without an order)
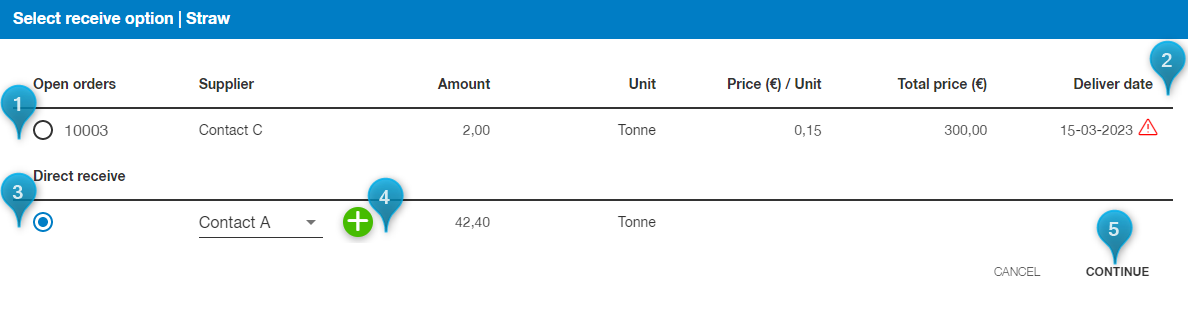
1. When there are open orders for the ingredient chosen, the option to receive the weight for that order(s) is displayed
2. When the (expected) deliver date of the order has expired, an exclamation mark is shown
3. Processing the weights from the weighbridge can also be done without an order through a direct receive.
4. For the direct receive, a supplier from the contact list in TAP FEED needs to be chosen. When the correct supplier is not yet in the list, the ‘+’ button can be used to add a new supplier
5. After details are correctly entered, press on ‘Continue’ to process the weight for the selected ingredient
12. Trash bin icon can be used to remove an open ticket. The ticket will then be removed and the weight of that ticket will not be saved to the inventory (it is also possible to remove multiple open tickets a the same time. Select the tickets to be removed and use the 'Delete selected' button to remove these).
13. All open tickets of a ticket can be selected to be processed in one go
14. The button ‘Process selected’ can be used to process all selected open tickets in one go with the same settings for the receive
Archived
After tickets are processed, the tickets move to the tab ‘Archive’.
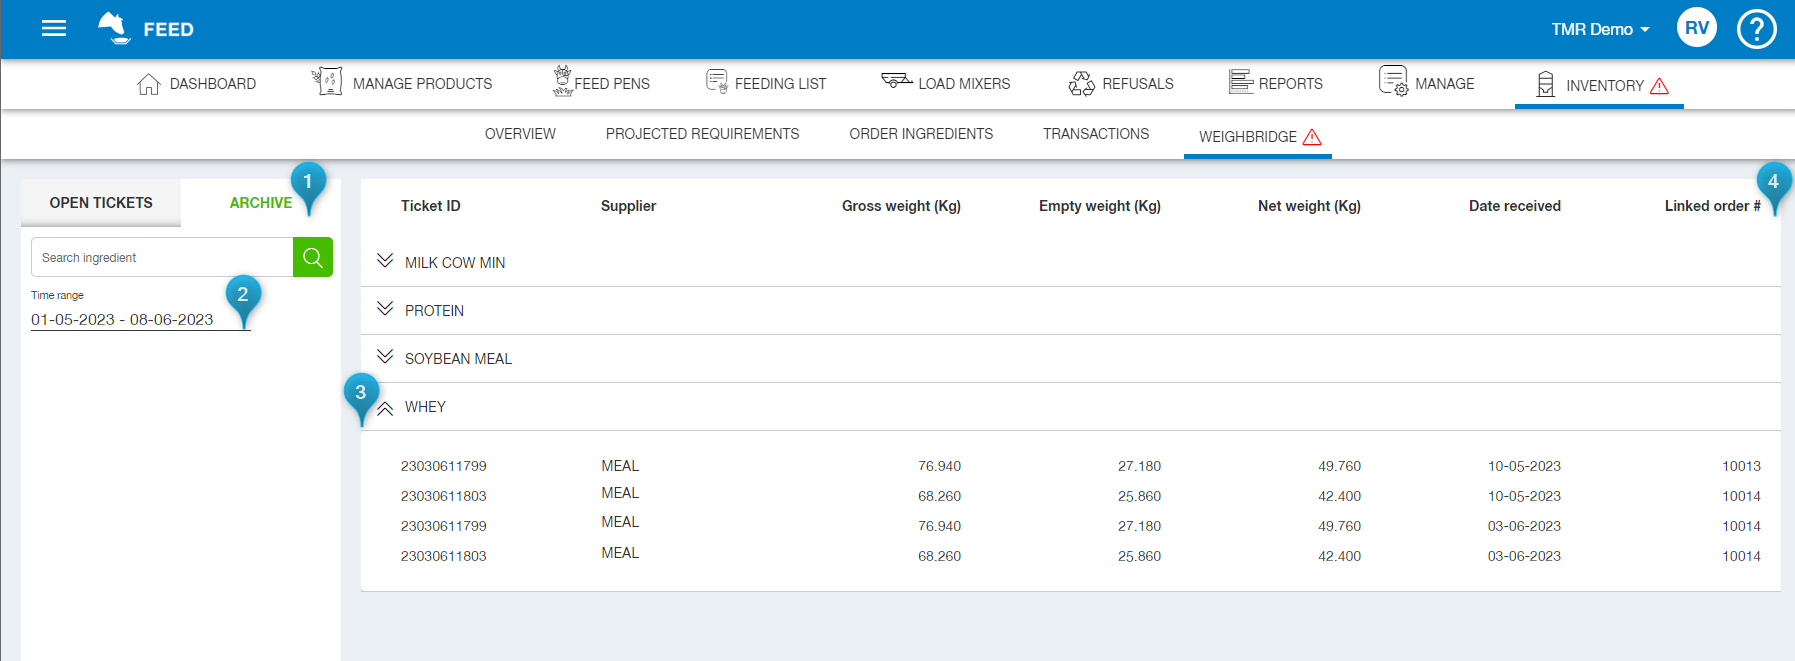
1. Details of the processed tickets are displayed here.
2. Select the time range when tickets were received. This time range is set to show the last 14 days by default
3. Expanding an ingredient will show the individual tickets that were received with their details
4. After a ticket has been processed, the order linked order is shown here. This linked order # can be found on the TRANSACTIONS overview as well
The transactions linked to weighbridge tickets have an ‘i’ icon on the right-hand side and hoovering over this icon will give the details of the linked tickets. If the transaction is incorrect, this can be deleted or undone:
1. A direct receive will show a ‘waste bin’ icon to delete the transaction. As soon as the transaction is deleted, the corresponding weighbridge ticket(s) are available to be processed again.
2. A received order will show an ‘undo’ icon to undo the receive. The order will be open again and the corresponding weighbridge ticket(s) are available to be processed again.
Process data WEIGHBRIDGE
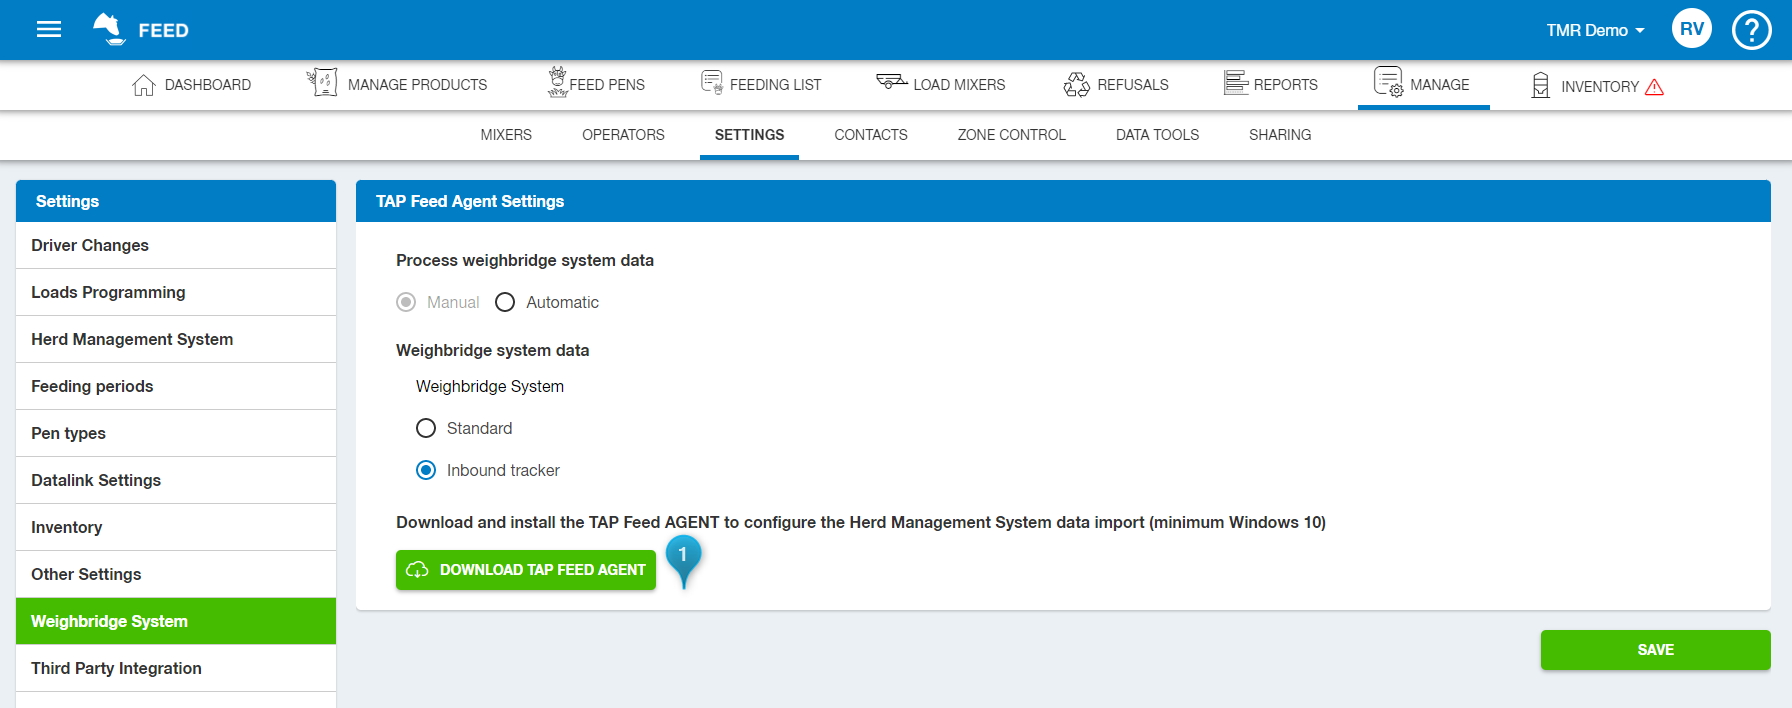
To process data from a weighbridge, the TAP FEED AGENT needs to be installed. When the TAP FEED AGENT is not yet installed, the installation file can be found through [MANAGE][SETTINGS][WEIGHBRIDGE SYSTEM]. An executable will be downloaded after clicking on ‘DOWNLOAD TAP FEED AGENT’. Please see information available with Mixers for the installation of the TAP FEED AGENT.
The settings for the weighbridge link can be found in the TAP FEED AGENT.
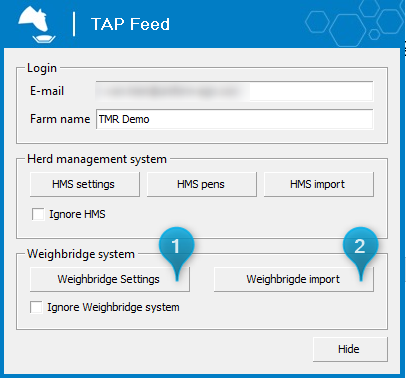
1. Before a file can be imported, the settings for the Weighbridge link need to be setup
2. After the settings are setup, the file from the Weighbridge can be imported manually through ‘Weighbridge import’
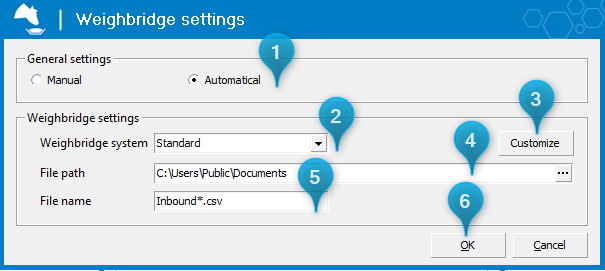
1. Data can be either imported manually or automatically. Manual import is done through the button ‘Weighbridge import’. When set to automatically, the file will be imported when it is place in the designated folder
2. The weighbridge system needs to be selected. When choosing ‘Inbound Tracker’, the settings for the default file are already set. When using another type of Weighbridge, then the ‘Standard’ system can be chosen.
3. The weighbridge file settings can be customized depending on the file you want to import (please see below for more details)
4. The file path is by default the public documents folder of the PC. By clicking on the three dots, another file path can be chosen
5. Indicate the name and extension of the file that will be imported
6. Click on ‘OK’ to save the settings

Depending on the file that needs to be imported, some file import settings need to be changed
1. Indicate from which line the system should start reading (when the first line is a header, please choose line 2 here)
2. Indicate what type of file will be imported
3. Check the file which column and decimal separator are used
4. When there are specific lines that should not be imported, this can be indicated here. For example, if lines that start with $ should always be skipped, this can be added through the ‘+’ button
5. For the date received, indicate where the date is positioned
6. By default the systems date format is used. When a different date format needs to be used, please enter this as dd-mm-yyyy for example
7. Items that will be imported from the file can be added here. For each item that is imported, the system needs to know in which column of the file the data is present
8. To save the settings, press on ‘OK’
How did we do with this article?
 Cookies & Tracking